Dear Family,
This is what will be arriving in your mailboxes
Those of you who are not getting a baggie in the mailbox but are making your own will need the following supplies. A glue gun, 7-8 popsicle sticks, a milk jug lid (or any other kind of lid), 4 rubber bands and as many pom poms as you think are necessary.
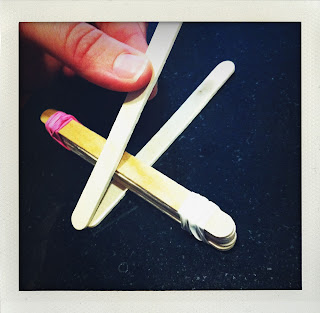
Start out by making a stack of 5-7 popsicle sticks and securely rubber-banding the ends--like so. (sorry about that made up verb)
Place two popsicle sticks on either side of your stack.
And rubber band them around the stack. You need to cross in front of the sticks both directions (so there is a little x on the front of the sticks to keep it secure)
This is what it looked like after 1 rubber band. Use another and do the same thing. The more of the bands that you put on the point of your launcher the farther your launcher will launch things. This is a trade-off though because it also makes in harder to launch. This one here that ended up with 6 or 7 rounds around the tip was easy enough for Claire to launch and still sent them quite a ways.
Here is what it looks like after two rubber bands. Warning: In the picture the center stack is turned the wrong way. It should be turned so that the top of the sticks are parallel to the floor. I didn't notice that it got turned around so all of the pictures from this point out show it the wrong way. Sorry. It will still work if you leave it this way your trajectory is just better if you have a higher cross beam.
Now you glue-gun on whatever kind of cap you have making sure that you leave enough space on the end of the stick for your finger to press down. (those of you getting a bag will not need to glue gun on your cap as I did it for you)
Add a pom pom and...
Enjoy.
Claire's new passion is photography so after I took a picture of her she insisted on taking one of me.


The poor man's Angry Birds! Good one!
ReplyDelete